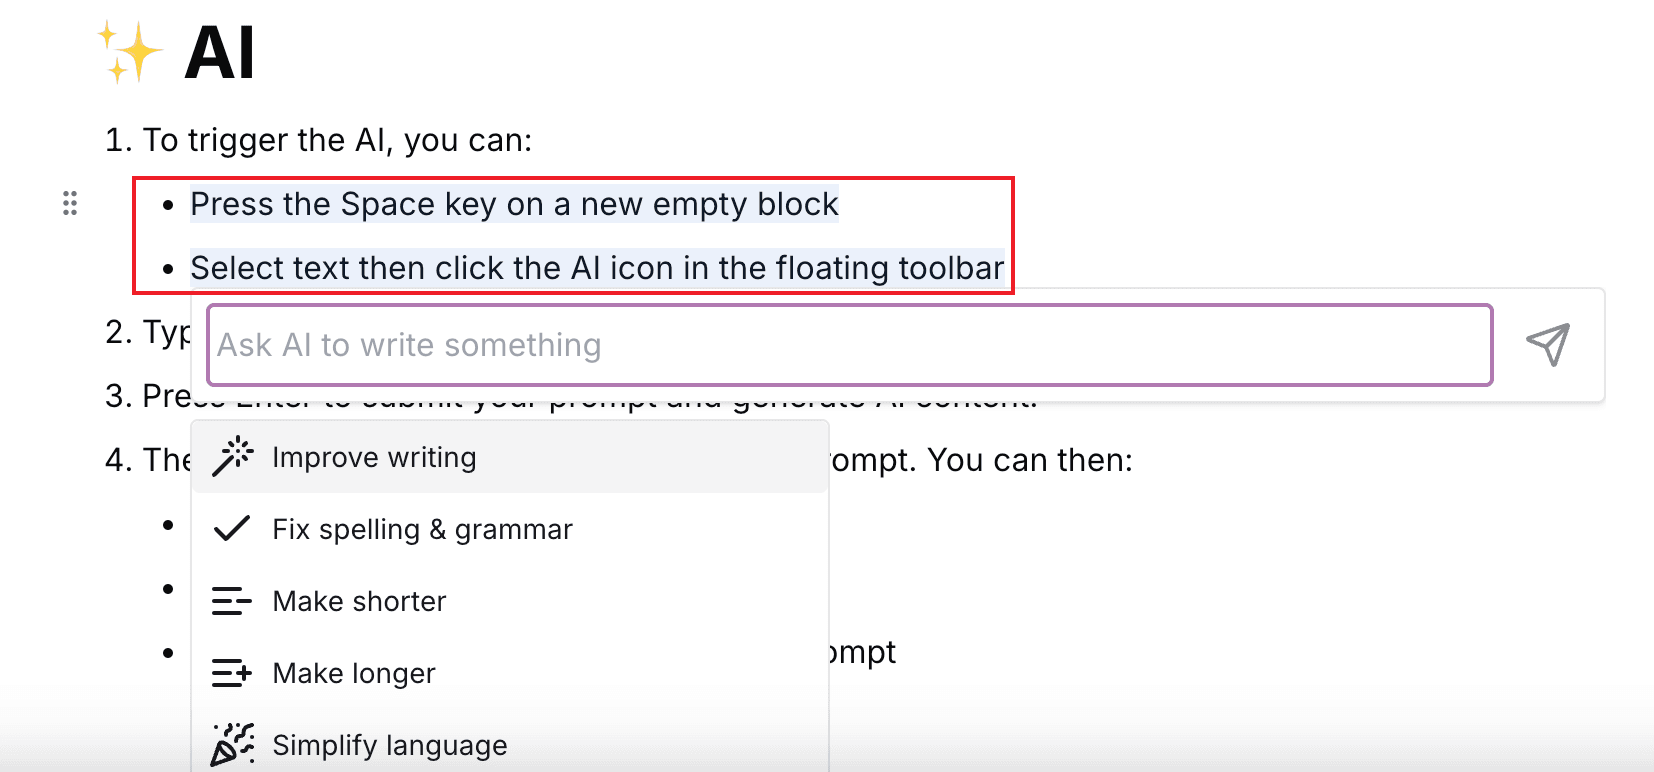
AI
allows you to select from a list of AI commands.
Installation
npm install @udecode/plate-ai @udecode/plate-menu @udecode/plate-selection @udecode/plate-markdownUsage
// ...
import { AIPlugin } from '@/registry/default/plate-pro/ai/ai/src/react/AIPlugin';

const editor = usePlateEditor({
  id: 'ai-demo',
  override: {
    components: PlateUI,
  },
  plugins: [
    ...commonPlugins,
    MarkdownPlugin.configure({ options: { indentList: true } }),
    SelectionOverlayPlugin,
    AIPlugin.configure({
      options: {
        createAIEditor: createAIEditor,
        // eslint-disable-next-line @typescript-eslint/require-await, @typescript-eslint/no-unused-vars
        fetchStream: async ({ abortSignal, prompt, system }) => {
          const response = await fetch(
            'https://pro.platejs.org/api/ai/command',
            {
              body: JSON.stringify({ prompt, system }),
              headers: {
                'Content-Type': 'application/json',
              },
              method: 'POST',
              signal: abortSignal.signal,
            }
          ).catch((error) => {
            console.error(error);
          });

          if (!response || !response.body) {
            throw new Error('Response or response body is null or abort');
          }

          return response.body;
        },
        scrollContainerSelector: `#your_scroll_container_id`,
      },
      render: { aboveEditable: AIMenu },
    }),
  ],
  value: aiValue,
});Install dependencies
Before integrating the AI plugin, you need to install the dependencies and it's components if required.
-
- The AI menu component for user interaction.
- We separated this menu from ai package mainly to reuse it for the context menu.
- Make sure to check the menu documentation and install the menu component sucessfully.
-
- To add a selected highlight to the newly generated paragraph after executing the AI command.
-
- To convert the ai generated markdown to slate nodes.
- If you are using indent list plugin, make sure to set the
options.indentListtotruelike the usage code above.
Integrate with your backend
fetchStream
options.fetchStream is an asynchronous function that you need to implement to fetch suggestions from your backend. This function is crucial for integrating the Copilot feature with your own AI model or service.
The function receives an object with three properties:
-
abortSignal: AnAbortSignalobject that allows you to cancel the request when pressing theesckey or clicking thecancelbutton. -
prompt: provider by thestreamInsertTextfunction you will see in the custom commands section below. -
system: provider by thestreamInsertTextfunction you will see in the custom commands section below.
The function should return a Promise that resolves to a ReadableStream containing the AI-generated text. This stream allows for real-time processing of the AI response, enabling features like streaming the text as it's generated.
Here's an next.js api route example of how you mock the return:
export function POST() {
  const streams = [
    { delay: 100, texts: 'Hello' },
    { delay: 200, texts: 'World' },
  ];

  const stream = new ReadableStream({
    async start(controller) {
      for (const stream of streams) {
        await new Promise((resolve) => setTimeout(resolve, stream.delay));
        controller.enqueue(stream.texts);
      }

      controller.close();
    },
  });

  return new Response(stream);
}Vercel AI SDK example:
We recommend using vercel ai sdk to generate the stream.
It's return ReadableStream, which is compatible with our requirement.
Note: Without reader means you don't need to use getReader we will parse the stream to text in our package.
So here is the example code to generate the stream:
api/ai/command
import { openai } from '@ai-sdk/openai';
import { streamText } from 'ai';
import { NextResponse } from 'next/server';

export async function POST(req: Request) {
  const { prompt, system, userId } = await req.json();

  const result = await streamText({
    model: openai('gpt-4o-mini'),
    prompt: prompt,
    system: system,
  });

  return new NextResponse(result.textStream);
}Plugin usage:
    AIPlugin.configure({
      options: {
        fetchStream: async ({ abortSignal, prompt, system }) => {
          const response = await fetch(
            'https://pro.platejs.org/api/ai/command',
            {
              body: JSON.stringify({ prompt, system }),
              headers: {
                'Content-Type': 'application/json',
              },
              method: 'POST',
              signal: abortSignal.signal,
            }
          )

          if(!response.body) {
            throw new Error('Failed to fetch stream');
          }

          // return the `ReadableStream` directly
          return response.body;
        }
      },
}),Customization commands
Customize existing commands.
Before learning how to create custom commands, you need to know that the ai plugin will provide three model for opening the ai menu:
- Open by space in the new block.We call it Cursor model.
- Open by floating toolbar button or context menu.We call it Selection model.
- After the AI completes the first generation, we don't close the AI menu but instead modify the commands. We call it Suggestion model.
Due to the special nature of Suggestion mode: whether Cursor mode or Selection mode ends, it will switch to Suggestion mode. To distinguish between these two sets of commands, we need to maintain four different menus in total.
The following is all the commands you can see in the ai-menu-items.tsx file.
- CursorCommands
- Show when you open the ai menu by
spacein the new block.
- Show when you open the ai menu by
- CursorSuggestions
- Show when you open the ai menu by
spaceand then complete the first generation.
- Show when you open the ai menu by
- SelectionCommands
- Show when you open the ai menu by selectd some text.
- SelectionSuggestions
- Show when you open the ai menu by selectd some text and then complete the first generation.
If you understand the above modes, you can easily find the corresponding command to modify its text or icons.
If you want to modify the AI Menu style, you should check the menu component docs.
Create new commands.
Understand the above modes then you can create new commands in the menu you want.
Next, I will show you how to add a custom command to Cursor mode (opened by space).
Find CursorCommands in the ai-menu-items.tsx file. then add a new MenuGroup with Generate Jokes label.
Create a MenuItem inside the MenuGroup with jokes action.
  <MenuGroup label="Generate Jokes">
    <MenuItem {...CursorCommandsActions.jokes} />
</MenuGroup>Full code:
export const CursorCommands = () => {
  return (
    <>
      <MenuGroup label="Write with AI">
        <MenuItem {...CursorCommandsActions.continueWrite} />
      </MenuGroup>
      <MenuSeparator />
      <MenuGroup label="Generate from page">
        <MenuItem {...CursorCommandsActions.Summarize} />
        <Menu
          label={CursorCommandsActions.translate.label}
          icon={CursorCommandsActions.translate.icon}
        >
          {renderMenuItems(CursorCommandsActions.translate)}
        </Menu>
        <MenuItem {...CursorCommandsActions.explain} />
      </MenuGroup>
      // new command group
       <MenuGroup label="Generate Jokes">
        <MenuItem {...CursorCommandsActions.jokes} />
      </MenuGroup>
    </>
  );
};Now we need to create a new action for the jokes command.
Find CursorCommandsActions in the ai-actions.ts file.
Then add a new jokes action and the const ACTION_JOKES it will be used in the cursorCommandsHandler file later.
export const ACTION_JOKES = 'action_jokes';

export const CursorCommandsActions = {
  ...
   jokes: {
    icon: <Icons.jokes />,
    label: 'Generate a dry joke',
    value: ACTION_JOKES,
  },
} satisfies Record<string, Action>;Now we can already see the new command in the ai menu.But when we click it nothing will happen.
Because we need to create a new case in the cursorCommandsHandler to handle the ACTION_JOKES action.
Find cursorCommandsHandler in the action-handler folder.
Then add ACTION_JOKES to the switch case.
case ACTION_JOKES: {
  await streamInsertText(editor, {
    prompt: `Generate a dry joke`,
    system: `You are a comedian. Generate a joke.`,
  });
  break;
}When we start calling the streamInsertText function, the ai menu will show the loading state.
NOTE: If you are creating a new selection mode command, you need to use the streamInsertTextSelection function instead of streamInsertText.
And then it will call the fetchStream function we implemented before.
In the same time you can get the same prompt and system you passed in the streamInsertText function.
  AIPlugin.configure({
      options: {
        fetchStream: async ({ abortSignal, prompt, system }) => {
          console.log(prompt); // "Generate a dry joke"
          console.log(system); // "You are a comedian. Generate a joke."
        }
      },
}),If you not pass the system in the streamInsertText function. We will use the default system maintained in our package.
When you writing the prompt see our existing commands to get inspiration.In general,
You need to provide the LLM with text in Markdown format instead of slate nodes.
Tests have shown that LLMs on the market are easier to understand text in MD format.
Here are two useful functions you can use to convert slate nodesto MD format.
// convert slate nodes to md
const md = serializeMdNodes(nodes);

// convert all editor content to md
const content = serializeMd(editor);At this point, you have successfully created an AI command.
If you want to create a nested menu, like the Translate example we provided, it's essentially the same steps,
but you'll need an additional constant for the Group.
Selection overlay
SelectionOverlayPlugin is part of the CursorOverlayPlugin Make sure you have installed it.
The SelectionOverlayPlugin is used to display a selection overlay on the editor. It enhances the visual feedback for users:
When the editor loses focus (blur event): It maintains a visual representation of the last selection.
So this plugin is userful when we open the ai menu. for example:
We selected two paragraphs of text. and then using floating toolbar open the ai menu Normally, these two paragraphs wouldn’t display a blue background. because our focus has already moved to the input box editor is blurred.
Sometimes we want to keep lose the selection highlight.In this case, You can use data-plate-prevent-overlay attribute add to the button which trigger the blur event.
For example, in the turn into dropdown menu: We’ve already prevented the default event so that clicking the ‘Turn Into’ menu doesn’t cause the editor to lose focus. Therefore, there’s no need to enable the SelectionOverlayPlugin functionality; otherwise, two layers of selection would appear, which would look visually unappealing.
      <DropdownMenuContent
        className="min-w-0"
        onCloseAutoFocus={onCloseAutoFocus}
        data-plate-prevent-overlay
        align="start"
      >
      ...
</DropdownMenuContent>Therefore, just remember one rule: only use this plugin when you need to move the focus to an external input element, such as the AI menu or math equation plugins.
Options
scrollContainerSelector- The selector of the scroll container.When we trigger the menu in the very bottom of the page, we need this option to make the scroll container scroll up to show the menu completely.
createAIEditor- When we use selection mode, we render a read-only editor on the AI menu, and the plugins used by this editor are provided by this option
fetchStream- The function to fetch the stream from your backend.Introdue in the Integrate with your backend section.
Plus
In the Potion template, we have meticulously configured all settings for the AI plugin, providing you with:
- Exquisite design and animation
- A comprehensive, full-stack AI integration
- Seamless handling of editor focus issues mentioned earlier
- Optimized configuration for peak performance
- Context menu to open the ai menu
- Slash command to open the ai menu
- debounce mode copilot
This template serves as an excellent starting point for your AI-enhanced editing projects, allowing you to leverage advanced features without the need for extensive setup.
API
editor.getApi(AIPlugin).ai.abort()
Aborts the ongoing AI request and sets the AI state to idle.
Returns
editor.getApi(AIPlugin).ai.clearLast()
Clears the last generated content, prompt, and work path.
Returns
editor.getApi(AIPlugin).ai.focusMenu()
Focuses the input element of AI menu, setting auto-focus and initial focus on the first item.
Returns
editor.getApi(AIPlugin).ai.hide()
Hides the AI menu by setting the open editor ID to null and removing the anchor element.
Returns
editor.getApi(AIPlugin).ai.setAnchorElement(dom: HTMLElement)
Sets the anchor element for the AI menu.
Parameters
The DOM element to set as the anchor for the AI menu.
Returns
editor.getApi(AIPlugin).ai.show(editorId: string, dom: HTMLElement, nodeEntry: NodeEntry)
Shows the AI menu for the specified editor, DOM element, and node entry.
Parameters
The ID of the editor to show the AI menu for.
The DOM element to anchor the AI menu to.
The node entry associated with the AI menu.